NestJS ile Basit Authentication Rest API
8 dakikalık okuma
216 okunma
0 beğeni
Önceki yazılarımızda NestJS’den biraz bahsetmiştik. Kolay ve modüler yapısı sayesinde kolayca web ve backend uygulamaları geliştirebiliriz. Bu yazımızda NestJS ile basit Rest Web servis/API oluşturacağız. Veri tabanı olarak MongoDB kullanacağız.
Eğer önceki yazımızı okumadıysanız sizi şöyle alalım; NestJS Framework Nedir ?
Öncelikle nest paketi global olarak kurulu değilse kuralım.
1npm i -g @nestjs/cli
Artık NestJS projesi oluşturabiliriz. Projeyi oluşturmak istediğimiz yola giderek projemizi oluşturalım.
1nest new project-name
Projemizde kullanacağımız bazı özellikler için gerekli paketleri yükleyelim.
1npm i class-validator class-transformer @nestjs/jwt passport-jwt @nestjs/passport passport passport-local
2npm i --save-dev @types/passport-jwt @types/passport-local
Veri tabanı olarak Mongodb kullanacağımız için gerekli node paketlerini yükleyelim.
1npm i @nestjs/mongoose mongoose
Tüm bağlılıkları yüklediğimize göre projemizi herhangi bir IDE ile açabiliriz. Projenin dosya ve klasör dizilimi şu şekildedir;
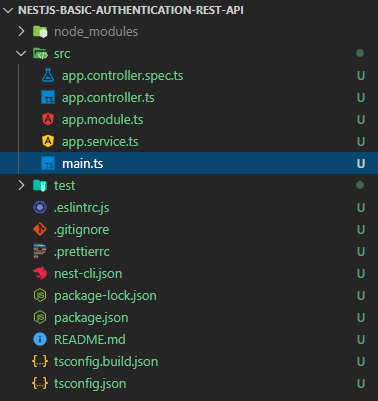
NestJS kodları okumaya main.ts‘den başlar. API ayarlarımızı yapılandırmak için src klasörünün içine app.config.ts adında dosya oluşturalım ve ilgili global ayarlarımızı yazalım.
1// app.config.ts
2export const Config = {
3 apiPort: 5050,
4 apiPrefix: 'api',
5 jwtSecretKey: 'secretKey',
6 jwtExpiresIn: '1 days',
7 mongoDbConnectionString: 'mongodb://localhost/database_name'
8}
- apiPort: Rest servisin çalışacağı port numarası
- apiPrefix: Rest servisin çalışacağı ön ek adresi.
- jwtSecretKey: Token oluşturulurken şifreleme keyi.
- jwtExpiresIn: Token’ın geçerli olacağı zaman.
- mongoDbConnectionString: Mongodb bağlantısı.
Proje ayarları için main.ts dosyasını açalım. Ardından gerekli ayarlamaları yapalım.
1// main.ts
2import { NestFactory } from '@nestjs/core';
3import { ValidationPipe } from '@nestjs/common';
4import { AppModule } from './app.module';
5import { Config } from './app.config';
6
7async function bootstrap() {
8  const app = await NestFactory.create(AppModule, {
9    logger: console
10  });
11  app.setGlobalPrefix(Config.apiPrefix);
12  app.useGlobalPipes(new ValidationPipe()); //Dtolarda tanımlanan tüm validasyonları uygulamaya yarar.
13  app.enableCors();
14  await app.listen(Config.apiPort);
15  console.log(`Application is running on: ${await app.getUrl()}`);
16}
17bootstrap();
Veritabanı olarak Mongodb kullanacağımız için app.module’de Connection String belirtmemiz gerekiyor;
1// app.module.ts
2import { Module } from '@nestjs/common';
3import { MongooseModule } from '@nestjs/mongoose';
4import { Config } from './app.config';
5import { AppController } from './app.controller';
6import { AppService } from './app.service';
7import { UserModule } from './user/user.module';
8
9@Module({
10  imports: [
11    MongooseModule.forRoot(Config.mongoDbConnectionString),
12    UserModule
13  ],
14  controllers: [AppController],
15  providers: [AppService],
16})
17export class AppModule {}
Artık modüllerimizi oluşturabiliriz. NestJS’ın CLI(command line interface) ile kolayca controller, module veya service oluşturabiliriz.
Tüm CLI komutlarını görebilmek için şu linki ziyaret edebilirsiniz; https://docs.nestjs.com/cli/usages
Kullanıcı işlemleri için user adında module, controller ve service oluşturuyoruz.
1nest g mo user & nest g co user & nest g s user
User modülünü oluşturduk. src dizininde common klasörü içerisine resimdeki gibi dosyalarımızı oluşturalım ve hazır hale getirelim;
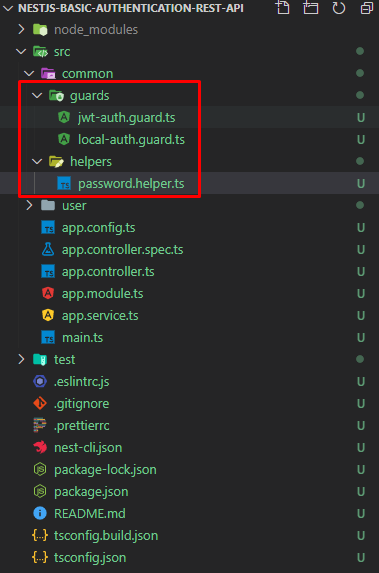
password.helper veri tabanında tutulan hashlenmiş şifreyle servise gönderilen şifrenin doğrulunu kontrol eder. Buna ek olarak yeni kullanıcı kaydında şifreyi veri tabanına kaydetmek için hashlenmiş bir biçimde bize döner.
1// password.helper.ts
2import { randomBytes, scrypt } from 'crypto';
3 export class PasswordHelper {
4   constructor() { }
5   public async passwordHash(password: string): Promise {
6     return new Promise((resolve, reject) => {
7       const salt = randomBytes(16).toString("hex");
8       scrypt(password, salt, 64, (err, derivedKey) => {
9         const hash = salt + ":" + derivedKey.toString('hex');
10         resolve(hash);
11       });
12     });
13   }
14  public async verifyPasswordHash(password: string, hash: string): Promise {
15     return new Promise((resolve, reject) => {
16       const [salt, key] = hash.split(":");
17       scrypt(password, salt, 64, (err, derivedKey) => {
18         if (err) reject(err);
19         if (key == derivedKey.toString('hex')) {
20           resolve(true);
21         } else {
22           resolve(false);
23         }
24       });
25     })
26   }
27 }
jwt-auth.guard ve local-auth.guard yetkisiz girişleri kontrol eder. Sonrasında Controller’da NestJS core’da bulunan UseGuards içine bu iki classı ekleyeceğiz.
1// jwt-auth.guard.ts
2import { Injectable } from '@nestjs/common';
3import { AuthGuard } from '@nestjs/passport';
4
5@Injectable()
6export class JwtAuthGuard extends AuthGuard('jwt') {}
1// local-auth.guard.ts
2import { Injectable } from '@nestjs/common';
3import { AuthGuard } from '@nestjs/passport';
4
5@Injectable()
6export class LocalAuthGuard extends AuthGuard('local') {}
Artık birkaç adım önce oluşturduğumuz User modülünü yazmaya başlayabiliriz. Öncelikle yine resimdeki gibi User klasörünün içine gerekli klasör ve dosyaları oluşturalım;
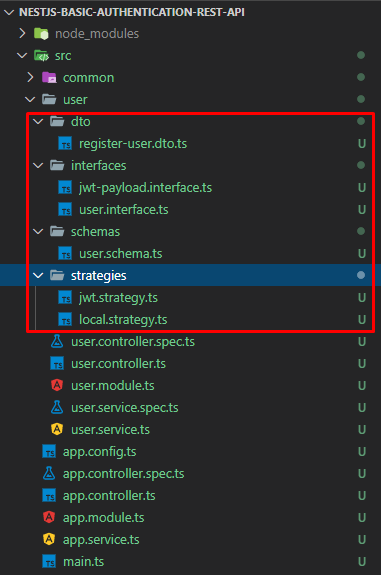
RegisterUserDto User servisine gelen Post işleminde hangi alanın hangi tipte olduğu, zorunlu olup olmadığı vb. gibi kontrol etmemizi sağlar. Örneğin userName boş olarak gönderildiğinde servisten otomatik olarak hata mesajı dönecektir.
1// register-user.dto.ts
2import { IsNotEmpty, IsString, IsEmail } from 'class-validator';
3
4export class RegisterUserDto {
5    @IsNotEmpty()
6    @IsString()
7    userName: string;
8
9    @IsNotEmpty()
10    @IsEmail()
11    email: string;
12
13    @IsNotEmpty()
14    @IsString()
15    password: string;
16
17    @IsNotEmpty()
18    @IsString()
19    name: string;
20
21    @IsNotEmpty()
22    @IsString()
23    surname: string;
24}
interfaceleri tanımlıyoruz;
1// jwt-payload.interface.ts
2export interface IJwtPayload {
3    readonly userId: string;
4    readonly userName: string;
5}
1// user.interface.ts
2import { Document } from 'mongoose';
3
4export interface IUser extends Document {
5    readonly userName: string;
6    readonly email: string;
7    readonly password: string;
8    readonly name: string;
9    readonly surname: string;
10}
Mongodb şemasını oluşturuyoruz;
1// user.schema.ts
2import { Document } from 'mongoose';
3import { Prop, Schema, SchemaFactory } from '@nestjs/mongoose';
4import { Document } from 'mongoose';
5
6export type UserDocument = User & Document;
7
8@Schema()
9export class User {
10
11  @Prop({ required: true, unique: true })
12  userName: string;
13
14  @Prop({ required: true, unique: true  })
15  email: string;
16
17  @Prop({ required: true, select: false })
18  password: string;
19
20  @Prop({ required: true })
21  name: string;
22
23  @Prop({ required: true })
24  surname: string;
25}
26
27export const UserSchema = SchemaFactory.createForClass(User);
Json Web Token ve Local Token için user modülü içerisinde Strategy sınıflarını oluşturuyoruz.
1// jwt.strategy.ts
2import { Injectable } from '@nestjs/common';
3import { PassportStrategy } from '@nestjs/passport';
4import { ExtractJwt, Strategy } from 'passport-jwt';
5import { IJwtPayload } from '../interfaces/jwt-payload.interface';
6import { Config } from '../../app.config';
7
8@Injectable()
9export class JwtStrategy extends PassportStrategy(Strategy) {
10  constructor() {
11    super({
12      jwtFromRequest: ExtractJwt.fromAuthHeaderAsBearerToken(),
13      ignoreExpiration: false,
14      secretOrKey: Config.jwtSecretKey,
15    });
16  }
17
18  async validate(payload: IJwtPayload) {
19    return { userName: payload.userName, userId: payload.userId };
20  }
21}
1// local.strategy.ts
2import { Injectable, UnauthorizedException } from '@nestjs/common';
3import { PassportStrategy } from '@nestjs/passport';
4import { Strategy } from 'passport-local';
5import { UserService } from '../user.service';
6
7@Injectable()
8export class LocalStrategy extends PassportStrategy(Strategy) {
9  constructor(private readonly service: UserService) {
10    super();
11  }
12
13  async validate(username: string, password: string): Promise<any> {
14    const user = await this.service.validateUser(username, password);
15    if (!user) {
16      throw new UnauthorizedException();
17    }
18    return user;
19  }
20}
Tüm bu işlemlerden sonra User modulüne controller ve providerları import etmemiz gerekiyor.
1// user.module.ts
2import { Module } from '@nestjs/common';
3import { MongooseModule } from '@nestjs/mongoose';
4import { JwtModule } from '@nestjs/jwt';
5import { PassportModule } from '@nestjs/passport';
6
7import { Config } from '../app.config';
8
9import { UserController } from './user.controller';
10import { User, UserSchema } from './schemas/user.schema';
11import { UserService } from './user.service';
12
13import { JwtStrategy } from './strategies/jwt.strategy';
14import { LocalStrategy } from './strategies/local.strategy';
15import { PasswordHelper } from '../common/helpers/password.helper';
16
17@Module({
18  imports: [
19    MongooseModule.forFeature([{ name: User.name, schema: UserSchema }]),
20    PassportModule,
21    JwtModule.register({
22      secret: Config.jwtSecretKey,
23      signOptions: { expiresIn: Config.jwtExpiresIn },
24    })
25  ],
26  controllers: [UserController],
27  providers: [LocalStrategy, JwtStrategy, PasswordHelper, UserService],
28})
29
30export class UserModule {}
User servisinde veri tabanıyla bağlantı kuracağımız gerekli fonksiyonları yazıyoruz. Sonrasında controller ile user servisten dataları alıp API tarafında döneceğiz.
1//user.service.ts
2import { HttpException, HttpStatus, Injectable } from '@nestjs/common';
3import { InjectModel } from '@nestjs/mongoose';
4import { Model } from 'mongoose';
5import { JwtService } from '@nestjs/jwt';
6import { IUser } from './interfaces/user.interface';
7import { IJwtPayload } from './interfaces/jwt-payload.interface';
8import { User, UserDocument } from './schemas/user.schema';
9import { RegisterUserDto } from './dto/register-user.dto';
10import { PasswordHelper } from '../common/helpers/password.helper';
11
12@Injectable()
13export class UserService {
14    constructor(
15        @InjectModel(User.name) private readonly userModel: Model<UserDocument>,
16        private jwtService: JwtService,
17        private passwordHelper: PasswordHelper
18    ) { }
19
20    async login(user: IUser) {
21        try {
22            const payload: IJwtPayload = { userName: user.userName, userId: user.id };
23            return { access_token: this.jwtService.sign(payload) };
24        } catch (err) {
25            throw new HttpException('Server Error', HttpStatus.INTERNAL_SERVER_ERROR);
26        }
27    }
28
29    async register(registerUserDto: RegisterUserDto): Promise<User> {
30        try {
31            const create = new this.userModel(registerUserDto);
32            return create.save();
33        } catch (err) {
34            throw new HttpException('Server Error', HttpStatus.INTERNAL_SERVER_ERROR);
35        }
36    }
37
38    async validateUser(userName: string, pass: string): Promise<IUser | null> {
39        try {
40            let findUser: IUser | null = null;
41            const find = await this.userModel.find({ userName }).select('+password').exec();
42            findUser = find.length > 0 ? find[0] : null;
43
44            if (findUser != null) {
45                const check = await this.passwordHelper.verifyPasswordHash(pass, findUser.password);
46                return check ? findUser : null;
47            }
48            return findUser;
49        } catch (err) {
50            throw new HttpException('Server Error', HttpStatus.INTERNAL_SERVER_ERROR);
51        }
52    }
53
54    async registerFindUser(userName: string, email: string): Promise<boolean> {
55        try {
56            const user = await this.userModel.find({ $or: [{ userName }, { email }] }).exec();
57            return user.length > 0 ? true : false;
58        } catch (err) {
59            throw new HttpException('Server Error', HttpStatus.INTERNAL_SERVER_ERROR);
60        }
61    }
62
63    async findUserById(id: string): Promise<IUser> {
64        try {
65            const find = await this.userModel.findById(id).exec();
66            return find;
67        } catch (err) {
68            throw new HttpException('Server Error', HttpStatus.INTERNAL_SERVER_ERROR);
69        }
70    }
71}
Servise gelen istekleri karşılayacağımız Controller’ı hazırlayalım;
1// user.controller.ts
2import { Body, Controller, HttpStatus, Post, Get, UseGuards, Request, Param, HttpException } from '@nestjs/common';
3import { UserService } from './user.service';
4import { RegisterUserDto } from './dto/register-user.dto';
5import { JwtAuthGuard } from '../common/guards/jwt-auth.guard';
6import { LocalAuthGuard } from '../common/guards/local-auth.guard';
7import { PasswordHelper } from '../common/helpers/password.helper';
8import { IUser } from './interfaces/user.interface';
9
10@Controller()
11export class UserController {
12    constructor(
13        private readonly service: UserService,
14        private passwordHelper: PasswordHelper
15    ) { }
16
17    @UseGuards(LocalAuthGuard) //LocalAuthGuard ile gelen auth isteğini erişim izni veriyoruz.
18    @Post('user/login')
19    async login(@Request() req) {
20        return this.service.login(req.user);
21    }
22
23    @Post('user/register')
24    async create(@Body() registerUserDto: RegisterUserDto) {
25        const userCheck = await this.service.registerFindUser(registerUserDto.userName, registerUserDto.email);
26        if (userCheck) throw new HttpException('REGISTER_EXISTING_USER', HttpStatus.INTERNAL_SERVER_ERROR);
27        registerUserDto.password = await this.passwordHelper.passwordHash(registerUserDto.password);
28        await this.service.register(registerUserDto);
29    }
30
31    @UseGuards(JwtAuthGuard) //JwtAuthGuard ile yetkisiz istekleri engelliyoruz.
32    @Get('user/profile')
33    async getProfile(@Request() req) {
34        const userId = req.user.userId;
35        const user: IUser = await this.service.findUserById(userId);
36        return user;
37    }
38
39    @UseGuards(JwtAuthGuard) //JwtAuthGuard ile yetkisiz istekleri engelliyoruz.
40    @Get('user/:id')
41    async getUserById(@Param('id') id: string) {
42        const user: IUser = await this.service.findUserById(id);
43        if (!user.id) throw new HttpException('BAD_REQUEST', HttpStatus.BAD_REQUEST);
44        return user;
45    }
46}
Artık projemizi debug modunda çalıştırabiliriz;
1npm run start:dev
Eğer bir hata yapmadıysak terminalde ki görünüm şu şekilde olacaktır;
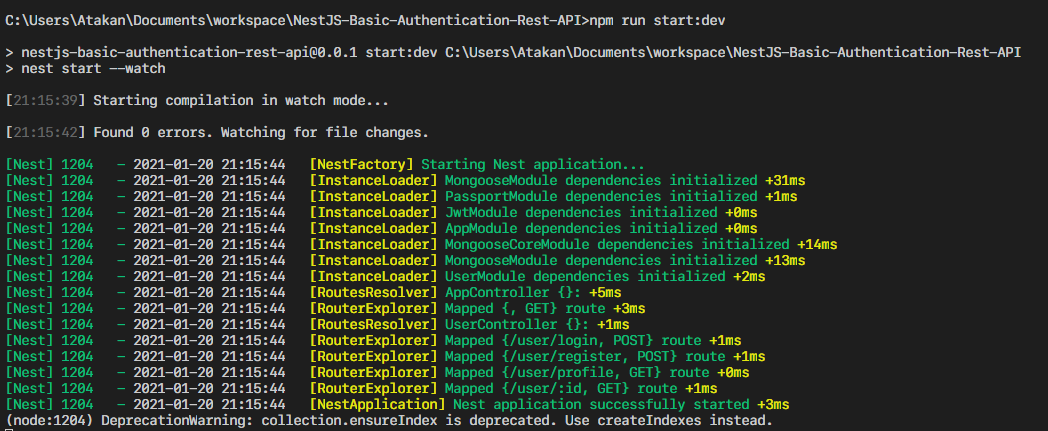
Artık servise http://localhost:5050 adresinden istek atabilirsiniz.
API Router Listesi
- /user/login (POST)
- /user/register (POST)
- /user/profile (GET)
- /user/:userId (GET)
Makalenin en altında vereceğim Github adresinden Postman dosyalarını alabilirsiniz ve import edebilirsiniz. Sonrasında servisi local ortamda test edebilirsiniz. Burada uzunca parametreleri ve headerda gönderilecek verileri yazmıyorum.
Servisin production sürümünü almak için şu komutu kullanabilirsiniz;
1npm run build
İşlem tamamlandıktan sonra dist/ klasörü dahil tüm dosyaları sunucumuza ilgili yerlere yüklemeliyiz. Projeyi production modunda çalıştırmak için;
1npm run start:prod
Sunucumuzda OpenLiteSpeed gibi sistemler kullanıyorsak Virtual Host bölümünden Node Context oluşturarak projenin sadece ilgili domain altında çalışmasını sağlayabiliriz.
- Github: https://github.com/atakanuludag/NestJS-Basic-Authentication-Rest-API
- NestJS Web Sayfası: https://nestjs.com/
- Dokümantasyon: https://docs.nestjs.com/
- Tüm CLI Komutları: https://docs.nestjs.com/cli/usages